Disclaimer:
This will create a very basic unsecured/not encrypted connection. This should only be done in a test lab environment. This is being setup in a Non Domain/Work group setting.
There is no certificate or DNS infrastructure in place. The connections will be going over TCP 5985. This is the Default TCP Port for not encrypted WinRM connections.
Environment:
2 x Windows 10 Virtual Machines on the same subnet.
WinRM1

WinRM2

Prerequisites:
Set Network Category to Private:
All network adapters should be set to “Private” or “DomainAuthenticated”.
If even one network adapter is set to Public, the firewall rule will NOT be added.
Since we are in a workgroup setting, the adapters will be set to “Private”
To Check what the network adapters Network Category is set to, run the following PowerShell command.
Get-NetConnectionProfile | Select InterfaceAlias,NetworkCategory

As can be seen above by default this is set to Public.
If you try to enable WinRM using this powerShell command
Enable-PSRemoting –force
You will get similar error message to this
“Set-WSManQuickConfig : <f:WSManFault xmlns:f=”http://schemas.microsoft.com/wbem/wsman/1/wsmanfault” Code=”2150859113″ Machine=”localhost”><f:Message><f:ProviderFault
provider=”Config provider” path=”%systemroot%\system32\WsmSvc.dll”><f:WSManFault xmlns:f=”http://schemas.microsoft.com/wbem/wsman/1/wsmanfault” Code=”2150859113″
Machine=”WinRM1″><f:Message>WinRM firewall exception will not work since one of the network connection types on this machine is set to Public. Change the network
connection type to either Domain or Private and try again. </f:Message></f:WSManFault></f:ProviderFault></f:Message></f:WSManFault>
At line:116 char:17
+ Set-WSManQuickConfig -force
+ ~~~~~~~~~~~~~~~~~~~~~~~~~~~
+ CategoryInfo : InvalidOperation: (:) [Set-WSManQuickConfig], InvalidOperationException
+ FullyQualifiedErrorId : WsManError,Microsoft.WSMan.Management.SetWSManQuickConfigCommand”
No Firewall exceptions have been made because at least one network adapter has its Network category set to “Public”
How to Fix This:
A quick and insecure way to change all network adapters to “Private” can be done via the following powershell command.
Get-NetConnectionProfile | Set-NetConnectionProfile -NetworkCategory Private

Enabling WinRM:
On each Device run the following powershell command:
Enable-PSRemoting –force
This time you should see:
WinRM has been updated to receive requests.
WinRM service type changed successfully.
WinRM service started.
WinRM has been updated for remote management.
WinRM firewall exception enabled.
Configured LocalAccountTokenFilterPolicy to grant administrative rights remotely to local users.”

Check if WinRM is listening for Connections:
To check if the service is listening use the following PowerShell command
Get-NetTCPConnection | Where-Object -Property LocalPort -EQ 5985
You should see something like.
LocalAddress LocalPort RemoteAddress RemotePort State AppliedSetting OwningProcess
———— ——— ————- ———- —– ————– ————-
:: 5985 :: 0 Listen 4

At this stage we are still unable to establish a connection as the “Remote/Destination” device is not in our Local devices “TrustedHosts List”.
As we do not have DNS available IP Addresses will be used.
Attempting to establish a session from WinRM1/10.10.10.11 to WinRM2/10.10.10.12
If we try to establish a PSSession to the other Device we will get the following error.
$Session = New-PSSession -ComputerName 10.10.10.12
New-PSSession : [10.10.10.12] Connecting to remote server 10.10.10.12 failed with the following error message : The WinRM client cannot process the request. If the
authentication scheme is different from Kerberos, or if the client computer is not joined to a domain, then HTTPS transport must be used or the destination machine must
be added to the TrustedHosts configuration setting. Use winrm.cmd to configure TrustedHosts. Note that computers in the TrustedHosts list might not be authenticated.
You can get more information about that by running the following command: winrm help config. For more information, see the about_Remote_Troubleshooting Help topic.
At line:1 char:12
+ $Session = New-PSSession -ComputerName 10.10.10.12
+ ~~~~~~~~~~~~~~~~~~~~~~~~~~~~~~~~~~~~~~~
+ CategoryInfo : OpenError: (System.Manageme….RemoteRunspace:RemoteRunspace) [New-PSSession], PSRemotingTransportException
+ FullyQualifiedErrorId : ServerNotTrusted,PSSessionOpenFailed
”

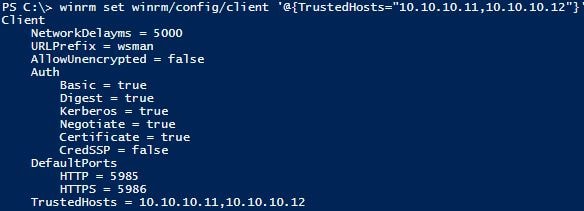
Adding Trusted Hosts:
Run the following command to add the other Device into the TrustedHosts List.
winrm set winrm/config/client '@{TrustedHosts="10.10.10.11,11.10.10.12"}'
Both servers have been added in the command above so that it is obvious how to add in multiple hosts
Making a connection:
Now lets attempt a connection from from WinRM1/10.10.10.11 to WinRM2/10.10.10.12
$Session = New-PSSession -ComputerName 10.10.10.12
It works!

Verify the connection:
PS C:\> Invoke-Command -Session $Session -ScriptBlock {hostname}
WinRM1

Inspect the port being used:
Get-NetTCPConnection | Where-Object -Property RemotePort -EQ 5985 | ft -AutoSize
LocalAddress LocalPort RemoteAddress RemotePort State AppliedSetting OwningProcess
———— ——— ————- ———- —– ————– ————-
10.10.10.11 1565 10.10.10.12 5985 Established Internet 3904
10.10.10.11 1563 10.10.10.12 5985 TimeWait 0
10.10.10.11 1558 10.10.10.12 5985 Established Internet 3904

The Script the Code:
Below is the essential commands needed to get WinRM up and running between the two Non Domain/Workgroup Windows 10 Devices
WinRM1 10.10.10.11
WinRM2 10.10.10.12
#Run this on both devices
#Set all network adapters to Private
Get-NetConnectionProfile | Set-NetConnectionProfile -NetworkCategory Private
#Enable PSRemoting
Enable-PSRemoting –force
#Add Trusted Hosts
winrm set winrm/config/client '@{TrustedHosts="10.10.10.11,11.10.10.12"}'